安装配置

1. 下载Nginx

1
wget http://nginx.org/download/nginx-1.8.1.tar.gz

2. 解压并进入目录操作

1
2
3
4
1. tar zxvf nginx-1.8.1.tar.gz
2. cd nginx-1.8.1
3. ./configure --prefix=/opt/nginx # 表示将ngnix安装在/opt/ngnix目录下
4. make & make install

3. ngnix安装成功 /opt/ngnix

4. 验证nginx配置文件是否正确

1
2
# 进入nginx安装目录
sbin/nginx -t

5. nginx相关操作

1
2
3
4
5
6
7
8
9
10
# nginx启动
sbin/nginx
# 停止nginx
sbin/nginx -s stop
# 或者
pkill nginx
# nginx重启
sbin/nginx -s reload
# 查看nginx状态
ps aux|grep nginx

6. 反向代理

1
2
3
4
5
6
7
8
9
10
11
12
13
14
15
16
17
18
19
20
21
22
23
24
25
26
27
28
29
30
31
32
33
34
35
36
37
38
39
40
41
42
43
44
45
# 在nginx.conf里面添加
server {
listen 8090;# 自己设置一个没有被占用的端口
server_name localhost;# 默认localhost就可以
location / {
proxy_pass http://47.94.245.33:8080; # 需要跨域的api
add_header 'Access-Control-Allow-Origin' '*';
if ($request_method = 'OPTIONS') {
add_header 'Access-Control-Allow-Origin' '*';
add_header 'Access-Control-Allow-Methods' 'GET, POST, OPTIONS';
#
# Custom headers and headers various browsers *should* be OK with but aren't
#
add_header 'Access-Control-Allow-Headers' 'X-Requested-By,DNT,X-CustomHeader,Keep-Alive,User-Agent,X-Requested-With,If-Modified-Since,Cache-Control,Content-Type';
#
# Tell client that this pre-flight info is valid for 20 days
#
add_header 'Access-Control-Max-Age' 1728000;
add_header 'Content-Type' 'text/plain charset=UTF-8';
add_header 'Content-Length' 0;
return 204;
}
if ($request_method = 'POST') {
add_header 'Access-Control-Allow-Origin' '*';
add_header 'Access-Control-Allow-Methods' 'GET, POST, OPTIONS';
add_header 'Access-Control-Allow-Headers' 'X-Requested-By,DNT,X-CustomHeader,Keep-Alive,User-Agent,X-Requested-With,If-Modified-Since,Cache-Control,Content-Type';
}
if ($request_method = 'GET') {
add_header 'Access-Control-Allow-Origin' '*';
add_header 'Access-Control-Allow-Methods' 'GET, POST, OPTIONS';
add_header 'Access-Control-Allow-Headers' 'X-Requested-By,DNT,X-CustomHeader,Keep-Alive,User-Agent,X-Requested-With,If-Modified-Since,Cache-Control,Content-Type';
}
}
}
# 前端ajax
$.ajax({
type:'get',
url:'http://172.16.0.97:8090/car-2.0/service/test/license',
success:function(data){
console.log(data);
},
error:function(){
console.log("错误");
}
})

7. 负载均衡

1
2
3
4
5
6
7
8
9
10
11
12
13
14
15
16
17
18
19
20
21
22
23
24
25
# nginx.conf
server {
listen 81;
server_name localhost;

#charset koi8-r;

location / {
proxy_pass http://kylin.com;
proxy_set_header Host $host;
proxy_set_header X-Real-IP $remote_addr;
proxy_set_header X-Forwarded-For $proxy_add_x_forwarded_for;
}


error_page 500 502 503 504 /50x.html;
location = /50x.html {
root html;
}

}
upstream kylin.com {
ip_hash; # 维持session会话持久性,避免频繁刷新页面出现登陆页面进行登陆
server xxx:7070;server xxx:7070;server xxx:7070;
}

FAQ

1. ./configure 出错

1
2
3
4
5
./configure: error: the HTTP cache module requires md5 functions
from OpenSSL library. You can either disable the module by using
--without-http-cache option, or install the OpenSSL library into the system,
or build the OpenSSL library statically from the source with nginx by using
--with-http_ssl_module --with-openssl=<path> options.
1
2
3
# 解决办法
yum -y install pcre-devel
yum -y install openssl openssl-devel

2. nginx: [emerg] bind() to 0.0.0.0:80 failed (98: Address already in use)

1
2
3
4
5
6
# 出现这个错误,说明80端口被占用,杀掉这个进程:
killall -9 nginx
# 进入nginx目录 cd /root/nginx
sbin/nginx # 执行这个命令,什么都不出现是正常的。
ps aux|grep nginx
出现下图信息证明nginx启动成功,浏览器访问nginx所在ip,即可出现nginx页面

3. nginx启动成功后出现403 Forbidden

1
2
3
4
# 在nginx根目录下的/conf/nginx.conf文件第一行里面添加
user root;
# 重启nginx
sbin/nginx -s reload

4. [error] open() “/opt/nginx/logs/nginx.pid”

1
2
[root@node104 nginx]# sbin/nginx -s reload
nginx: [error] open() "/opt/nginx/logs/nginx.pid" failed (2: No such file or directory)

解决办法:

1
2
cd /opt/nginx
sbin/nginx -c conf/nginx.conf

5. ngnix在CentOS-6系统启动报错

5.1 报错1
1
sbin/nginx: error while loading shared libraries: libpcre.so.1: cannot open shared object file: No such file or directory

解决办法:

1
2
3
cd /lib64
ln -s libpcre.so.0.0.1 libpcre.so.1
ll /lib64/libpcre*

5.2 报错2
1
sbin/nginx: /lib64/libc.so.6: version `GLIBC_2.14' not found (required by sbin/nginx)

问题分析:

1
2
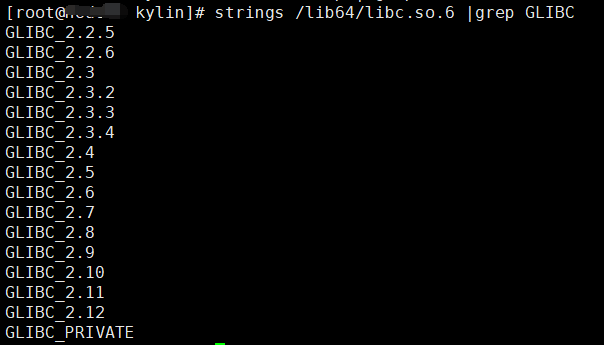
# 查看版本,发现仅支持到2.12
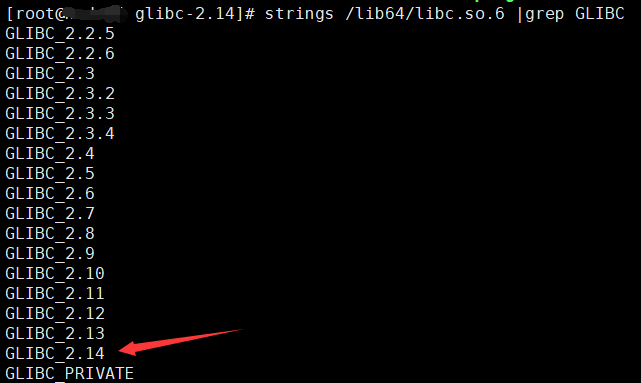
strings /lib64/libc.so.6 |grep GLIBC

解决办法:

1
2
3
4
5
6
7
8
9
10
11
12
cd /opt
wget http://ftp.gnu.org/gnu/glibc/glibc-2.14.tar.gz
tar zxvf glibc-2.14.tar.gz
cd glibc-2.14
mkdir build && cd build
../configure --prefix=/opt/glibc-2.14
make -j4
make install
# 编译完成后,将libc-2.14.so拷贝到/lib64目录下(本机环境为CentOS-6 64位系统)
cp /opt/glibc-2.14/lib/libc-2.14.so /lib64/
# 软链到
ln -sf /lib64/libc-2.14.so /lib64/libc.so.6

5.3 问题3:

升级glibc到2.14后,出现ssh登陆时出现:

-bash: warning: setlocale: LC_CTYPE: cannot change locale (en_US.UTF-8): No such file or directory

解决办法:

1
2
3
4
5
cp -r /usr/lib/locale /opt/glibc-2.14/lib/
[root@node98 ~]# ll /opt/glibc-2.14/lib/locale
total 96836
-rw-r--r--. 1 root root 99158576 Dec 14 02:33 locale-archive
-rw-r--r--. 1 root root 0 Dec 14 02:33 locale-archive.tmpl

问题解决。

参考自:https://blog.csdn.net/guitar___/article/details/77651983#commentBox

5.4 报错4:

问题:执行date命令

1
2
[root@xxxxx ~]# date
Mon Dec 17 05:41:43 Local time zone must be set--see zic manual page 2018

问题分析:

就是升级libc.so.6导致的!

GNU中对TZ环境变量的说明中指出,如果TZ没有值,会默认选择时区,具体地址由libc.so.6这个库决定。在升级前,centos的默认时区文件为/etc/localtime。而我新编译的库时,设置了–prefix=/opt/glibc-2.14,导致默认路径为变成了/opt/glibc-2.14/etc/localtime,自然就找不到默认时区了。

解决方案:

1
ln -sf /etc/localtime /usr/local/glibc-2.14/etc/localtime

测试:

1
2
[root@xxxxx ~]# date
Mon Dec 17 13:51:48 CST 2018

问题解决。