自定义Service
声明:博主写了一些Ambari系列文章,可以在历史文章中查看。
一、选择合适的Stack版本
首先,我们需要规划自定义的Serivice属于哪个Stack,当时部署ambari集群的时候选择的是HDP 2.6 的Stack,所以就将自定义的Service放在HDP 2.6 下。
把自定义的Service文件夹放在/var/lib/ambari-server/resources/stacks/HDP/2.6/services/目录下。以SAMPLE为自定义服务(*注:服务名称必须保证为大写。):
1 | mkdir /var/lib/ambari-server/resources/stacks/HDP/2.6/services/SAMPLE |
二、编写metainfo.xml 文件
在 SAMPLE目录下创建 metainfo.xml来描述新服务。示例代码如下。主要解释下 xml 代码中的两个字段 category 和 cardinality。category 指定了该模块(Component)的类别,可以是 MASTER、SLAVE、CLIENT。Cardinality 指的是所要安装的机器数,可以是固定数字 1,可以是一个范围比如 1-2,也可以是 1+、0+,或者 ALL。如果是一个范围的时候,安装的时候会让用户选择机器。另外这里有关 Service 和 Component 的 name 配置要用大写,小写有时候会有问题。Displayname 可以随意设置。
metainfo.xml定义了Ambari管理Service的一些配置内容,该文件对应Service定义起着至关重要的作用。
1 | <?xml version="1.0"?> |
在上面,我的服务名称是SAMPLE,它包含:
- 一个MASTER组件“
SAMPLE_MASTER” - 一个SLAVE组件“
SAMPLE_SLAVE” - 一个CLIENT组件“
SAMPLE_CLIENT”
metainfo.xml配置详解可参考:https://cwiki.apache.org/confluence/display/AMBARI/Writing+metainfo.xml
三、创建Service的命令脚本
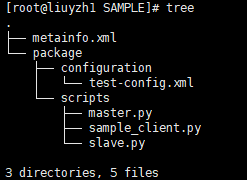
在 SAMPLE 底下创建一个 package 目录,然后在 package 底下创建目录 scripts ,进而创建 master.py 和 slave.py。这里需要保证脚本路径和上一步中 metainfo.xml 中的配置路径是一致的。这两个 Python 脚本是用来控制 Master 和 Slave 模块的生命周期。脚本中函数的含义也如其名字一样:install 就是安装调用的接口;start、stop 分别就是启停的调用;Status 是定期检查 component 状态的调用;Configure 是安装完成配置该模块的调用。示例目录结构如下图。
接下来,让我们创建该命令脚本。命令脚本是统一放在scripts文件内的。首先创建目录:
1 | mkdir -p /var/lib/ambari-server/resources/stacks/HDP/2.6/services/SAMPLE/package/scripts |
对于每个组件,您必须指定执行命令时使用的< commandScript >。根据组件类别,组件必须支持一组定义的默认命令。
| Component Category | Default Lifecycle Commands |
|---|---|
| MASTER | install, start, stop, configure, status |
| SLAVE | install, start, stop, configure, status |
| CLIENT | install, configure, status |
创建.py命令脚本
例如
master.py文件:1
2
3
4
5
6
7
8
9
10
11
12
13
14
15
16import sys
from resource_management import *
class Master(Script):
def install(self, env):
print 'Install the Sample Srv Master';
def stop(self, env):
print 'Stop the Sample Srv Master';
def start(self, env):
print 'Start the Sample Srv Master';
def status(self, env):
print 'Status of the Sample Srv Master';
def configure(self, env):
print 'Configure the Sample Srv Master';
if __name__ == "__main__":
Master().execute() 例如
slave.py文件:1
2
3
4
5
6
7
8
9
10
11
12
13
14
15import sys
from resource_management import *
class Slave(Script):
def install(self, env):
print 'Install the Sample Srv Slave';
def stop(self, env):
print 'Stop the Sample Srv Slave';
def start(self, env):
print 'Start the Sample Srv Slave';
def status(self, env):
print 'Status of the Sample Srv Slave';
def configure(self, env):
print 'Configure the Sample Srv Slave';
if __name__ == "__main__":
Slave().execute() 例如
sample_client.py文件:1
2
3
4
5
6
7
8
9
10
11import sys
from resource_management import *
class SampleClient(Script):
def install(self, env):
print 'Install the Sample Srv Client';
def configure(self, env):
print 'Configure the Sample Srv Client';
def status(self, env):
print 'Status of the Sample Srv Client';
if __name__ == "__main__":
SampleClient().execute()
四、添加xml文件
在服务的根目录下的configuration,创建目录并进入:
1 | mkdir -p /var/lib/ambari-server/resources/stacks/HDP/2.6/services/SAMPLE/package/configuration |
在configuration目录下,新建.xml属性文件
1 | vim test-config.xml |
1 | <?xml version="1.0"?> |
五、总体项目架构
六、重启Ambari-server服务
需要重启 Ambari Server。因为 Ambari Server 只有在重启的时候才会读取 Service 和 Stack 的配置。命令行执行: ambari-server restart
七、增加自定义服务
登录 Ambari 界面,点击左下角的 Action,选择 Add Service。
然后我们可以看到自定义的Service:SAMPLE

八、推荐资料
【1】Ambari自定义服务集成实战教学(完结):https://www.yuque.com/create17/ambari/miyk6c
点关注,不迷路
好了各位,以上就是这篇文章的全部内容了,能看到这里的人呀,都是人才。
白嫖不好,创作不易。各位的支持和认可,就是我创作的最大动力,我们下篇文章见!
如果本篇博客有任何错误,请批评指教,不胜感激 !


原文作者: create17
原文链接: https://841809077.github.io/2018/06/04/Ambari/自定义服务/自定义Service.html
版权声明: 转载请注明出处(码字不易,请保留作者署名及链接,谢谢配合!)

