最近在项目上完成了附件上传和下载功能,是用的 fastdfs 来实现的。好记性不如烂笔头,今天把关键代码记录下来,方便以后复用。
一、Base64 转 图片url
1)在 pom.xml 中添加依赖:
1
2
3
4
5
6
|
<dependency>
<groupId>org.springframework.boot</groupId>
<artifactId>spring-boot-starter-fastdfs</artifactId>
<version>1.0-SNAPSHOT</version>
</dependency>
|
2)在 application.yml 中添加 fastdfs 相关配置:
1
2
3
4
5
6
7
8
9
10
11
12
13
14
15
| fdfsIp: http://fastdfs:8880/
fastdfs:
connecttimeout-in-seconds: 5
network-timeout-in-seconds: 10
charset: UTF-8
http-anti-steal-token: false
http-secret-key: FastDFS1234567890
http-tracker-http-port: 8888
tracker-server-list:
- fastdfs:22122
|
示例代码:
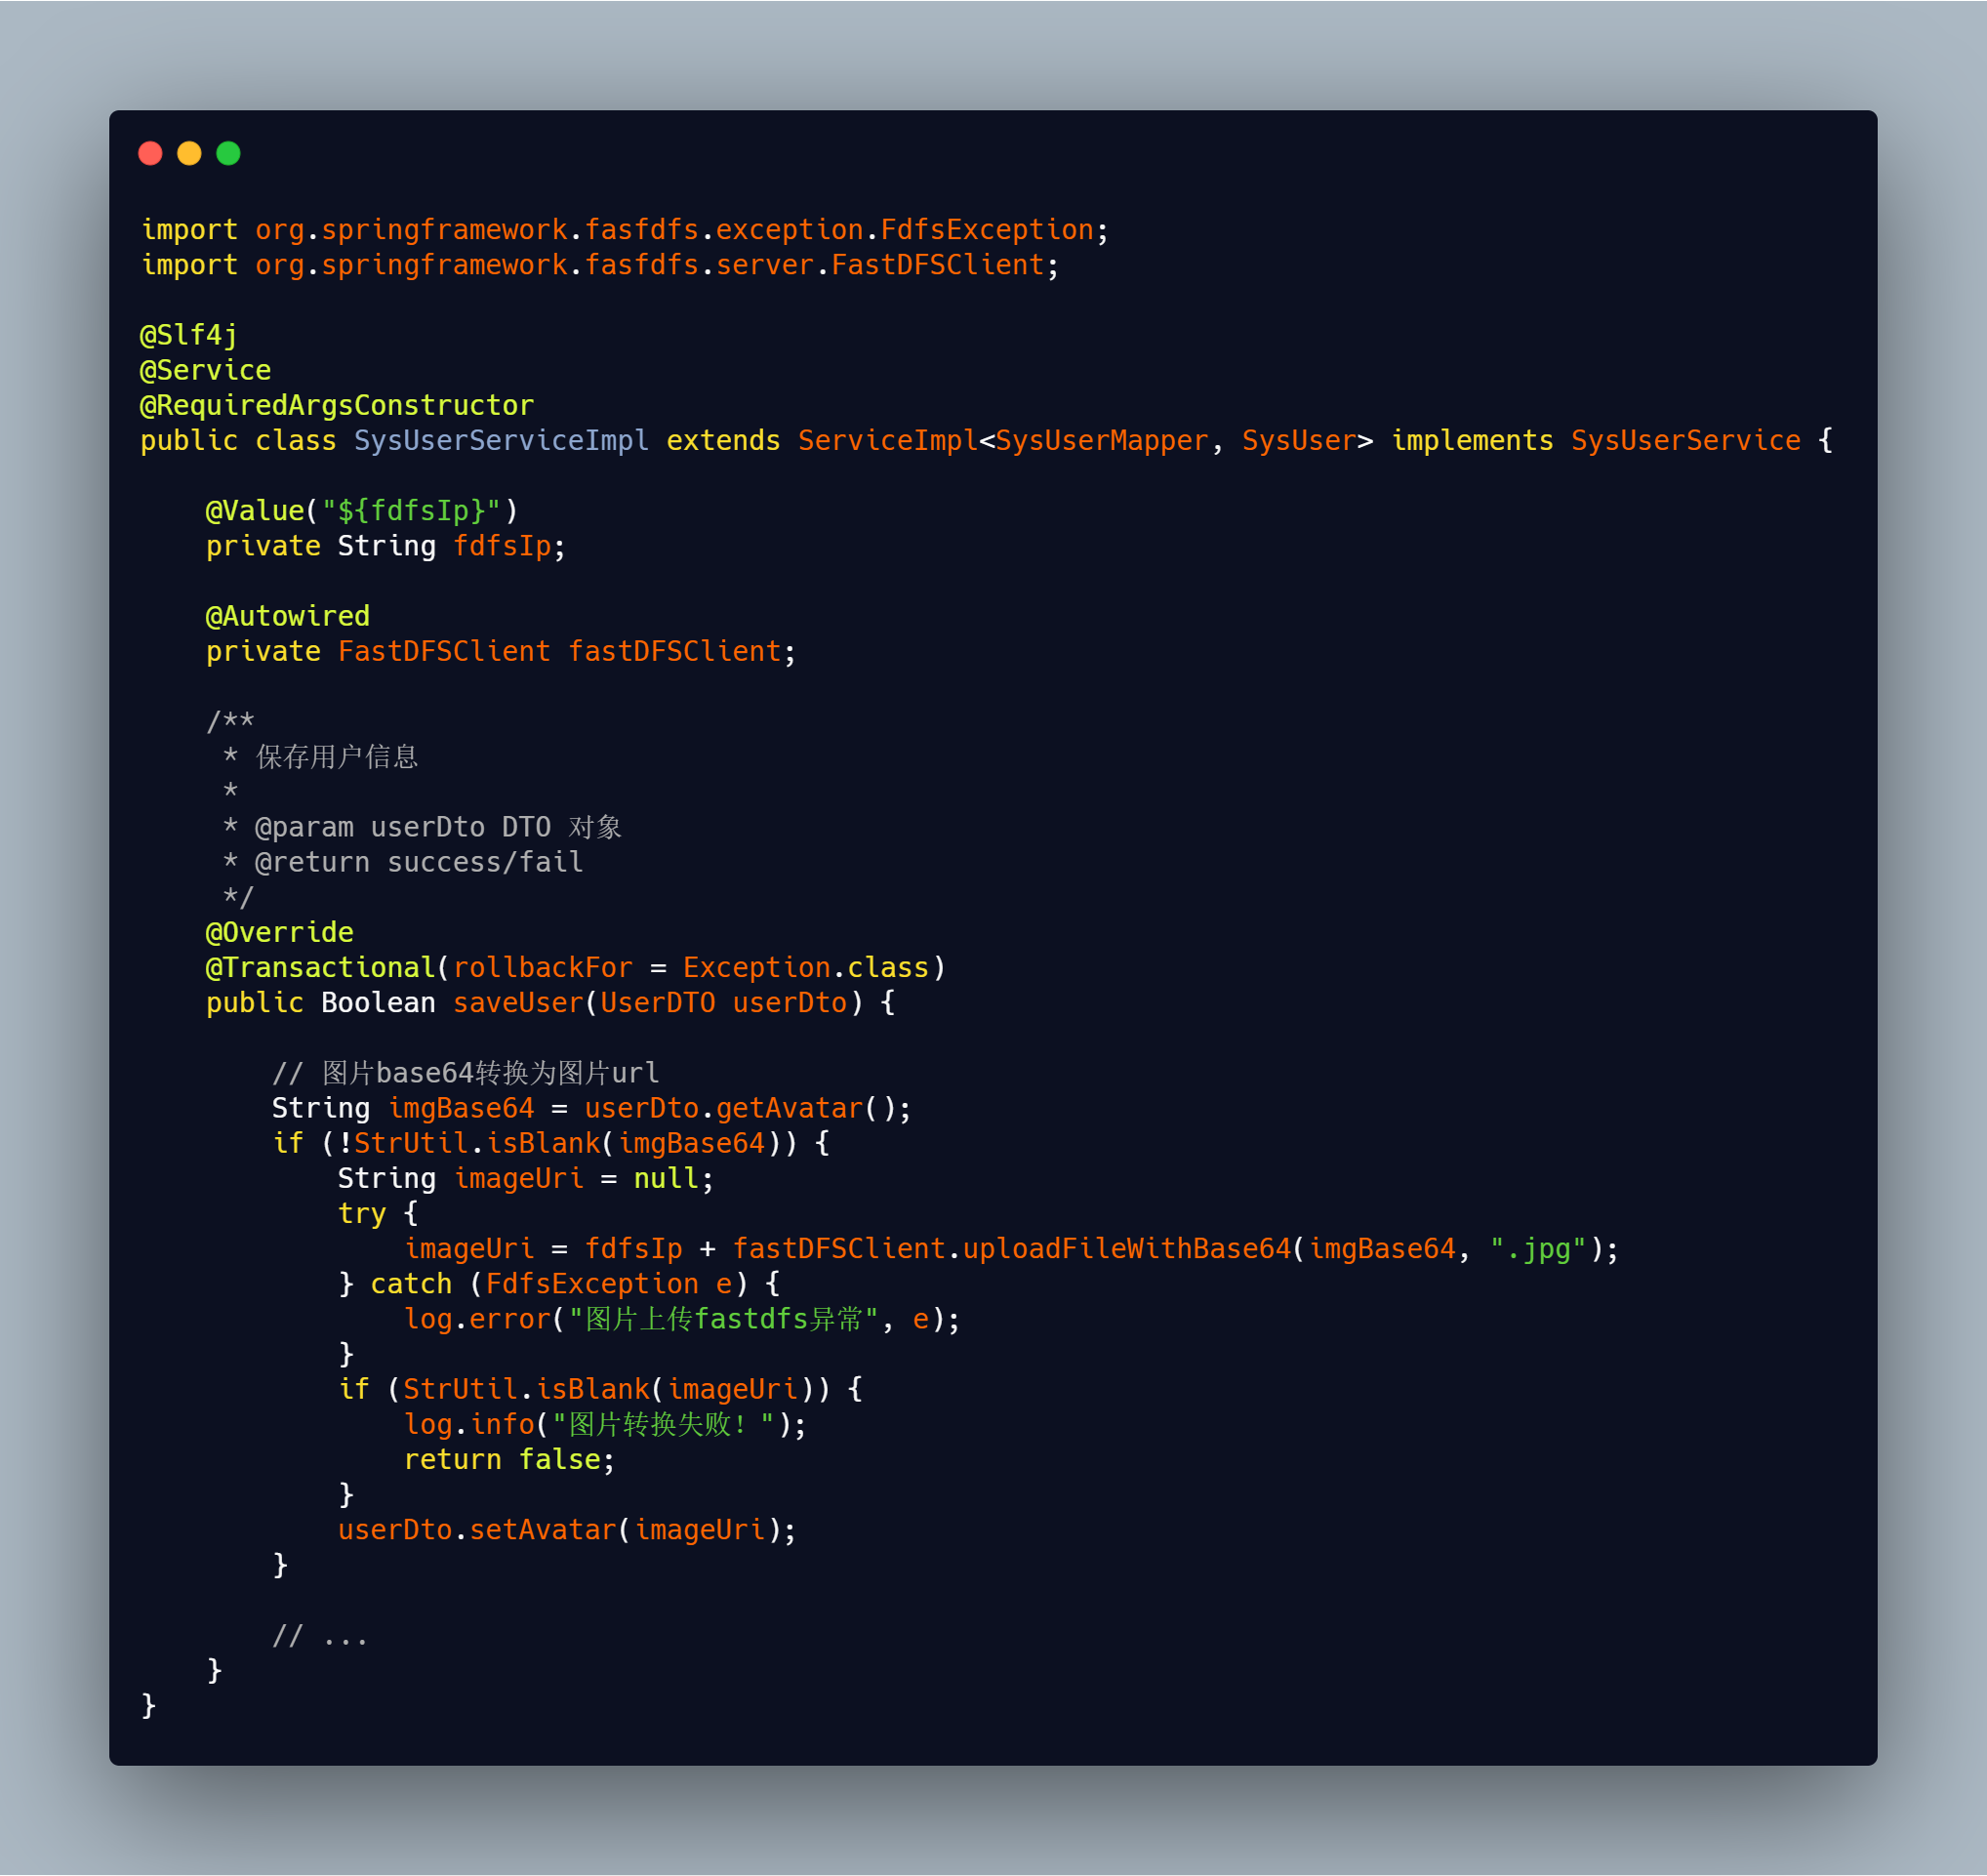
上述方法就是将图片的 base64 码进行转换并上传到了 fastdfs 上。以下是可复制粘贴的源码:
1
2
3
4
5
6
7
8
9
10
11
12
13
14
15
16
17
18
19
20
21
22
23
24
25
26
27
28
29
30
31
32
33
34
35
36
37
38
39
40
41
42
43
| import org.springframework.fasfdfs.exception.FdfsException;
import org.springframework.fasfdfs.server.FastDFSClient;
@Slf4j
@Service
@RequiredArgsConstructor
public class SysUserServiceImpl extends ServiceImpl<SysUserMapper, SysUser> implements SysUserService {
@Value("${fdfsIp}")
private String fdfsIp;
@Autowired
private FastDFSClient fastDFSClient;
@Override
@Transactional(rollbackFor = Exception.class)
public Boolean saveUser(UserDTO userDto) {
String imgBase64 = userDto.getAvatar();
if (!StrUtil.isBlank(imgBase64)) {
String imageUri = null;
try {
imageUri = fdfsIp + fastDFSClient.uploadFileWithBase64(imgBase64, ".jpg");
} catch (FdfsException e) {
log.error("图片上传fastdfs异常", e);
}
if (StrUtil.isBlank(imageUri)) {
log.info("图片转换失败!");
return false;
}
userDto.setAvatar(imageUri);
}
}
}
|
二、文件(word、pdf)上传到 fastdfs
关于像 word、pdf 这样的文件上传到 fastdfs,我是通过 fastdfs-client-java 这个 jar 包来实现:
1)在 pom.xml 文件中添加依赖:
1
2
3
4
5
| <dependency>
<groupId>org.csource</groupId>
<artifactId>fastdfs-client-java</artifactId>
<version>1.27-SNAPSHOT</version>
</dependency>
|
2)添加 fastdfs_client.conf 文件
1
2
3
4
5
6
7
8
9
10
| #jar中使用时需要将此文件名修改为fastdfs_client.conf 。
#也可以在jar被调用方resource下加入fastdfs_client.conf 内容如下
connect_timeout = 60
network_timeout = 120
charset = UTF-8
http.tracker_http_port = 8888
http.anti_steal_token = no
http.secret_key = FastDFS1234567890
tracker_server =fastdfs:22122
|
3)相关代码实现
fastdfs 文件属性相关:
1
2
3
4
5
6
7
8
9
10
11
12
13
14
15
16
17
18
19
20
21
22
23
24
25
26
| @Data
public class FastDFSFile implements Serializable {
private static final long serialVersionUID = 2637755431406080379L;
private byte[] content;
private String name;
private Long size;
public FastDFSFile(byte[] content, String name, Long size){
this.content = content;
this.name = name;
this.size = size;
}
}
|
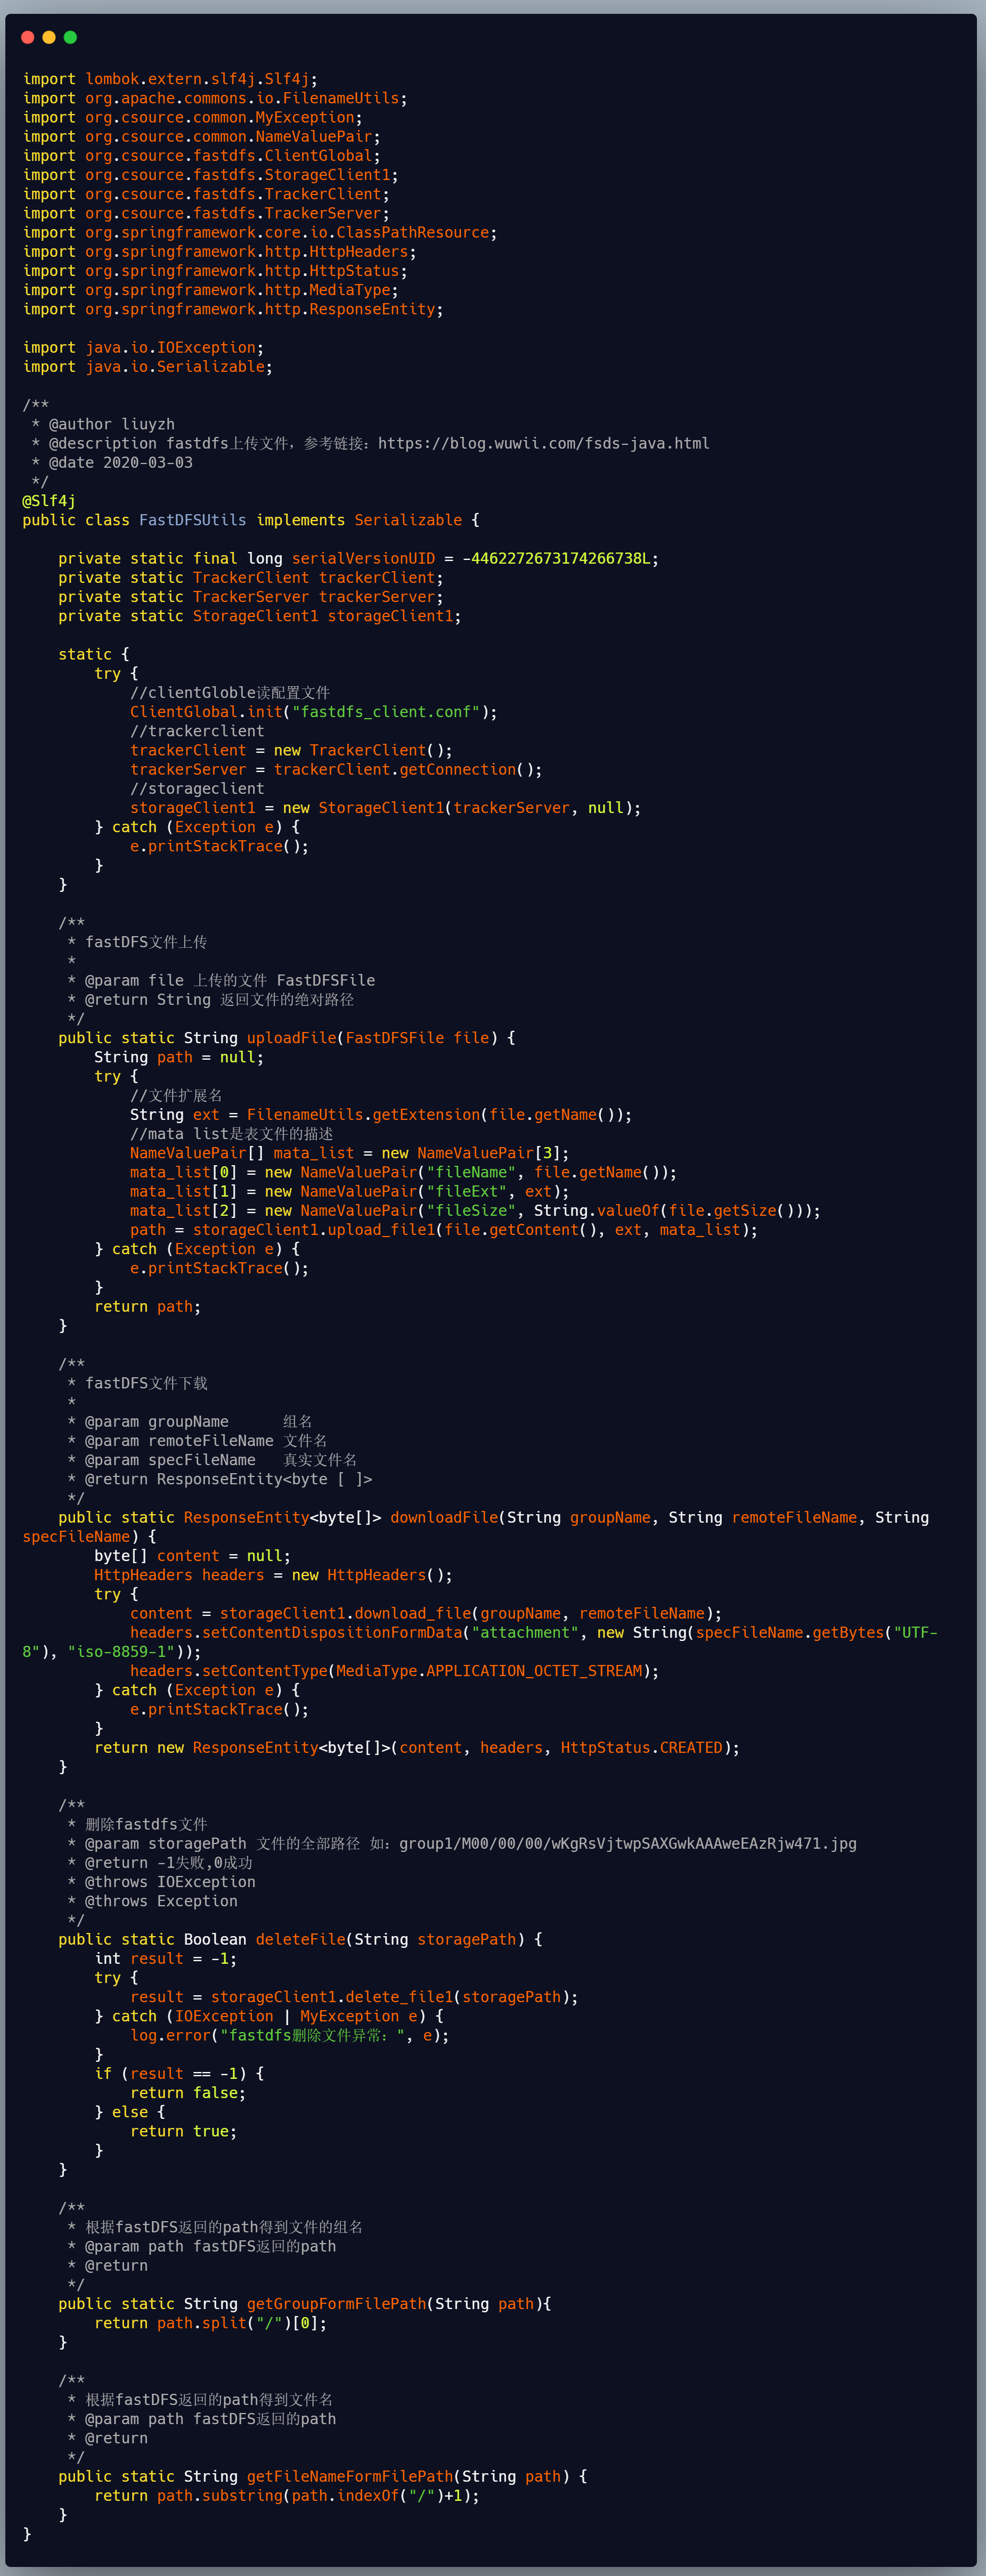
fastdfs 工具类相关(包含初始化 fatdfs 连接,上传、下载、删除文件):
1
2
3
4
5
6
7
8
9
10
11
12
13
14
15
16
17
18
19
20
21
22
23
24
25
26
27
28
29
30
31
32
33
34
35
36
37
38
39
40
41
42
43
44
45
46
47
48
49
50
51
52
53
54
55
56
57
58
59
60
61
62
63
64
65
66
67
68
69
70
71
72
73
74
75
76
77
78
79
80
81
82
83
84
85
86
87
88
89
90
91
92
93
94
95
96
97
98
99
100
101
102
103
104
105
106
107
108
109
110
111
112
113
114
115
116
117
118
119
120
121
122
123
124
125
126
127
| import lombok.extern.slf4j.Slf4j;
import org.apache.commons.io.FilenameUtils;
import org.csource.common.MyException;
import org.csource.common.NameValuePair;
import org.csource.fastdfs.ClientGlobal;
import org.csource.fastdfs.StorageClient1;
import org.csource.fastdfs.TrackerClient;
import org.csource.fastdfs.TrackerServer;
import org.springframework.core.io.ClassPathResource;
import org.springframework.http.HttpHeaders;
import org.springframework.http.HttpStatus;
import org.springframework.http.MediaType;
import org.springframework.http.ResponseEntity;
import java.io.IOException;
import java.io.Serializable;
@Slf4j
public class FastDFSUtils implements Serializable {
private static final long serialVersionUID = -4462272673174266738L;
private static TrackerClient trackerClient;
private static TrackerServer trackerServer;
private static StorageClient1 storageClient1;
static {
try {
ClientGlobal.init("fastdfs_client.conf");
trackerClient = new TrackerClient();
trackerServer = trackerClient.getConnection();
storageClient1 = new StorageClient1(trackerServer, null);
} catch (Exception e) {
e.printStackTrace();
}
}
public static String uploadFile(FastDFSFile file) {
String path = null;
try {
String ext = FilenameUtils.getExtension(file.getName());
NameValuePair[] mata_list = new NameValuePair[3];
mata_list[0] = new NameValuePair("fileName", file.getName());
mata_list[1] = new NameValuePair("fileExt", ext);
mata_list[2] = new NameValuePair("fileSize", String.valueOf(file.getSize()));
path = storageClient1.upload_file1(file.getContent(), ext, mata_list);
} catch (Exception e) {
e.printStackTrace();
}
return path;
}
public static ResponseEntity<byte[]> downloadFile(String groupName, String remoteFileName, String specFileName) {
byte[] content = null;
HttpHeaders headers = new HttpHeaders();
try {
content = storageClient1.download_file(groupName, remoteFileName);
headers.setContentDispositionFormData("attachment", new String(specFileName.getBytes("UTF-8"), "iso-8859-1"));
headers.setContentType(MediaType.APPLICATION_OCTET_STREAM);
} catch (Exception e) {
e.printStackTrace();
}
return new ResponseEntity<byte[]>(content, headers, HttpStatus.CREATED);
}
public static Boolean deleteFile(String storagePath) {
int result = -1;
try {
result = storageClient1.delete_file1(storagePath);
} catch (IOException | MyException e) {
log.error("fastdfs删除文件异常:", e);
}
if (result == -1) {
return false;
} else {
return true;
}
}
public static String getGroupFormFilePath(String path){
return path.split("/")[0];
}
public static String getFileNameFormFilePath(String path) {
return path.substring(path.indexOf("/")+1);
}
}
|
上传代码示例:
1
2
3
4
5
6
7
8
9
10
11
12
13
14
15
16
17
18
19
20
21
22
23
24
| @Override
@SneakyThrows
public R uploadFile(MultipartFile file) {
JSONObject jsonObject = new JSONObject();
try {
Long fileSize = file.getSize();
if (fileSize >= 5 * 1024 * 1024) {
return R.failed("附件大小不允许超过5M");
}
String attachmentName = file.getOriginalFilename();
FastDFSFile fastDFSFile = new FastDFSFile(file.getBytes(), file.getOriginalFilename(), file.getSize());
String attachmentPath = FastDFSUtils.uploadFile(fastDFSFile);
jsonObject.put("attachmentPath", attachmentPath);
jsonObject.put("attachmentName", attachmentName);
jsonObject.put("attachmentSize", OtherUtil.getFileSizeUnit(fileSize));
return R.ok(jsonObject);
} catch (IOException e) {
log.info("上传附件异常:", e);
}
return R.failed("附件上传异常");
}
|
下载代码示例(两种):
1
2
3
4
5
6
7
8
9
10
11
12
13
14
15
16
17
18
19
|
@RequestMapping(value = "/download")
public ResponseEntity<byte[]> download(String path) {
AttachmentInfo attachmentInfo = attachmentInfoService.getAttachmentInfoByUrl(path);
String specFileName = attachmentInfo.getFileName();
String filename = FastDFSUtils.getFileNameFormFilePath(path);
String group = FastDFSUtils.getGroupFormFilePath(path);
return FastDFSUtils.downloadFile(group, filename, specFileName);
}
|
这样就可以实现浏览器下载了。不过还可以用 nginx 的方式来完成文件的下载:
在 nginx 的 fastdfs 相关 server 配置里面添加:
1
2
3
| if ($arg_attname ~* .(doc|docx|txt|pdf|zip|rar|xls|xlsx|png|jpeg|jpg)$) {
add_header Content-Disposition "attachment;filename=$arg_attname";
}
|
如下图所示:
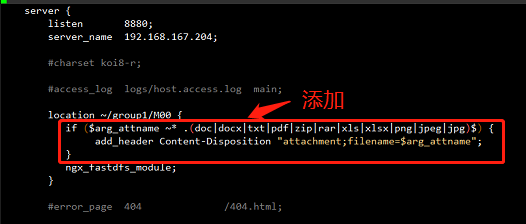
重启 nginx 后,这样就可以通过访问 url 来进行文件下载了。
比如:http://fastdfs:8880/group1/M00/03/CF/wKinzF5d-EOAWPuEAAGjUNtaNqM02.docx?attname=测试.docx 。
删除代码示例:
1
2
3
4
5
6
7
8
9
10
11
12
13
14
15
16
17
18
19
|
public static Boolean deleteFile(String storagePath) {
int result = -1;
try {
result = storageClient1.delete_file1(storagePath);
} catch (IOException | MyException e) {
log.error("fastdfs删除文件异常:", e);
}
if (result == -1) {
return false;
} else {
return true;
}
}
|
三、小结
关于 fastdfs 的文件上传、下载、删除的示例代码上面都已经介绍清楚了,如果有小伙伴遇到了 fastdfs jar 包的依赖问题,也不要慌,我已经踩过坑了,出坑记录:实操:Could not autowire No beans of ‘FastDFS Client’ type found 的解决方法 ,可以看这篇。
点关注,不迷路
好了各位,以上就是这篇文章的全部内容了,能看到这里的人呀,都是人才。
白嫖不好,创作不易。 各位的支持和认可,就是我创作的最大动力,我们下篇文章见!
如果本篇博客有任何错误,请批评指教,不胜感激 !


